Welcome to our project documentation page, work in progress. If you have questions, check the community page and ask us!
1 - Overview
What and where to find it.
Welcome to the OtterCast documentation. Please see the sections below or on the left for what you are looking for. If your questions couldn’t be answered here, please check our Community page for help.
What is it?
OtterCast is an open-source audio streaming device running Linux. Based on a Sochip S3 SoC, featuring a Webinterface, shairport-sync, snapcast, Spotify Connect and pulseaudio sink/source. With a resolution of 24bit at 48kHz, combined with an elegant analog design and real time latency compensation OtterCast provides you with the best wireless audio experience.
Why do I want it?
Because it plays your favorite music over the air, reliably, whenever you need it. Is there more to say?
Where should I go next?
- Getting Started: Get started with OtterCast
- Firmware: Download the firmware
2 - Getting Started
How to get started?
Get your device
You still need the Hardware? We are planning a small production run, but until that has happened, please refer to the production files and instructions located in our repositories.
Get the firmware
After acquiring your device, you may head to our firmware section.
Flashed, and now?
You can mount the SD-Card and change the initial configuration by edition the config.ini file, present on the first partition. You should add your Wifi credentials and give your Ottercast a lovely hostname, it will be displayed later when you are casting! If you need SSH access, you can add your public key by creating a ssh_authorized_keys file containing your key.
It works!
Great, you did it! You may now check out the supported protocols and start casting or visit your Ottercasts web-interface by typing <hostname>.local into your browsers address bar.
3 - Firmware
Details about the Firmware, Software, Webinterface
Ottercast Firmware is built using buildroot.
It’s running a mainline Linux kernel, with GNU userland, systemd, PulseAudio and Avahi.
Download ready-made images
Current firmware binaries can be found on GitHub at:
Ottercast/buildroot-ottercast-audio
Firmware images are automatically built for each commit via GitHub Actions.
Flashing the image
The procedure is identical to a Raspberry Pi. Make sure to unzip (.gz/gzip) the firmware before writing it to a card.
Firmware binaries are disk images, containing partitions and can be written directly to an SD card or eMMC flash.
Do NOT copy the file onto a SD card as a file.
It needs to be written as a disk image using a tool like Etcher, Win32 Disk Imager or dd.
Initial configuration
After flashing, you can mount the FAT32 partition and edit the config.sh and (optional) ssh_authorized_keys.
Configure your WiFi credentials, SSH public keys and a name for the device.
Building your own image
Building your own image can be done on a regular x86_64 machine running Linux.
Make sure to fulfill the buildroot dependencies:
| Distribution | Command |
|---|---|
| Arch/Manjaro | pacman -S base-devel git wget perl unzip rsync ncurses |
| Debian/Ubuntu/Mint | apt install build-essential git wget unzip rsync libncurses-dev |
These dependency lists are untested, please report if something is missing!
mkdir ottercast
cd ottercast
git clone https://github.com/Ottercast/buildroot-ottercast-audio.git
wget https://buildroot.org/downloads/buildroot-2021.02.1.tar.gz
tar xfv buildroot-2021.02.1.tar.gz
cd buildroot-2021.02.1/
make BR2_EXTERNAL=../buildroot-ottercast-audio/buildroot/ ottercast_s3_defconfig
This will generate a config file in the buildroot folder.
(optional) Use make menuconfig to change buildroot settings (enable/disable packages, compile settings, etc.).
(optional) Use make linux-menuconfig to change kernel parameters.
Compile the firmware using make -j$(nproc).
This will take ~60min on a very fast machine with stable internet connection.
First compilation will download, compile and assemble a full Linux installation from scratch.
This can take up to several hours. Be patient! Changes will build much faster.
The resulting disk image will be located at buildroot-(version)/output/images/sdcard.img.
The external tree can be found at: https://github.com/Ottercast/buildroot-ottercast-audio.
Webinterface
The webinterface is written in PHP and running as a CGI script.
uhttpd is used as a webserver and serves /var/www on Port 80 via HTTP.
Frontend is using Bootstrap and jQuery.
4 - Supported protocols
Which audio streaming services/protocols are supported?
Ottercast is open source! If your favorite app/protocol is missing, open an Issue or integrate it yourself and send a Pull Request.
Snapcast
Snapcast is a multiroom-capable network audio player.
Ottercast can act as a Snapcast client and will connect to a Snapcast server which is streaming audio.
Multiple Ottercasts (and other Snapcast clients) can connect to the same server and will play perfectly synced audio.
Ottercast can also work as a Snapcast server and stream audio from it’s Line-In port to multiple Snapcast clients.
Spotifyd / Spotify Connect
Spotifyd is a Spotify Connect client, written in Rust, utilizing the librespot library.
Requires Spotify Premium.

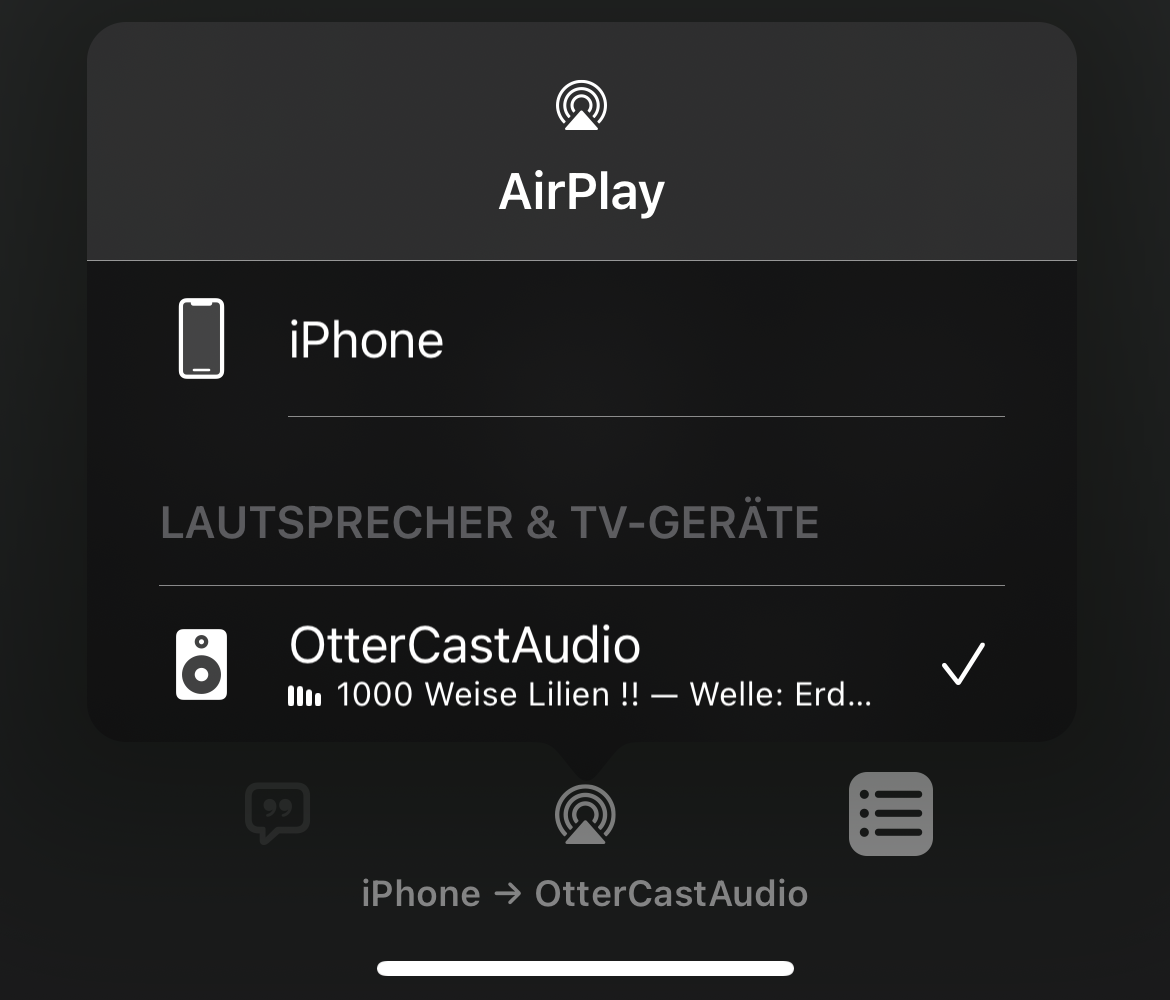
Shairport Sync / AirPlay
Shairport Sync is an open source reimplementation of the AirPlay protocol.
You can select your Ottercast as an AirPlay target on your iOS/macOS devices.
Shairport supports full audio synchronisation, which means audio/video sync will be enforced.
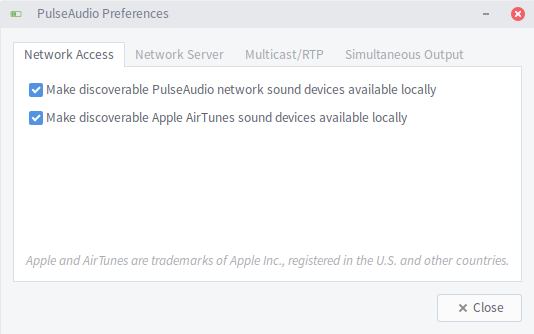
PulseAudio Sink
Ottercast can act as a PulseAudio Sink via module-native-protocol-tcp.
Use paprefs to enable local discovery and ensure avahi-daemon is running.
Line In
Not really a protocol, but a yet badly supported input method! Connect a line-in via the TRS jack on the back of the OtterCastAmp or the left TRS jack of the OtterCastAudio, then log onto the device via SSH and run pactl load-module module-loopback latency_msec=1.
You may need to adjust the input volume by running PULSE_SERVER=x.x.x.x pavucontrol and e.g. lowering the input volume to 30%.